

Hello amazing people 👋
In this blog article, we will see some basic and most useful commands in Git.
What will be covered in this Blog
- What is Git?
- What is GitHub?
- Git vs GitHub
- Why Git & Github ?
- Git basic terminology
- Git installation
- Git configuration
- Git commands:- Working With Local Repositories
- Git commands:- Working with Local Branch
- Git commands:- Working With Remote Repositories
- Additional Commands
- Conclusion
What is Git?
Git is a well-known DevOps tool used for source code management. It is a free and open-source version control system used to handle small and large projects efficiently. A version control system is a type of software that keeps track of every modification to the source code. So, Git is a place where you can store your source code, track changes in your source code, collaborate more easily with other developers to work together on non-linear development, and you can also contribute to an open-source. Git has been used by various organizations, businesses, professionals, and even startups to manage their code, task allocation, and project management.
You must have heard about GitHub, GitLab, or Bitbucket. These are just cloud-based hosting services that let you manage Git.
In this article, I'll be using Github to explain further.
What is Github?
With more than 56 million users, 3 million organizations, and 100 million repositories, GitHub is one of the most advanced development platforms in the world. It has several useful features that enable development teams to work together on the same project and easily create new versions of software without disrupting the current versions.
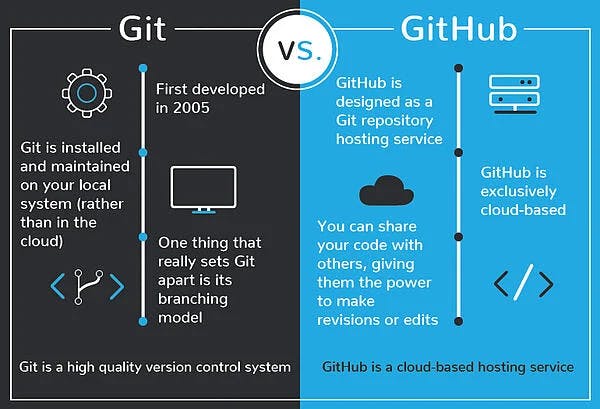
Git vs GitHub
Why Git & GitHub?
Git is a version control system. With Git, every time you commit your code, Git remembers what has changed since the last time you saved your code. It simplifies the process of working with other people and makes it easy to collaborate on projects.
Github is like Facebook for programmers. It is a great way to get noticed — Show off your code and your projects! Especially if you’re a self-taught developer. By using GitHub regularly you can learn how to work well in a development team environment.
Companies and Technologies around the world use Git: Amazon, Facebook, LinkedIn, Yahoo, Microsoft, Netflix, Rails, Android, Linux, and Zendesk — just to name a few. Learn Git and become more hire-able
Basic terminology
Before you get started with Git commands, you need to understand some important terms:
1.) Repository(Repo):-
A repository is like a folder or storage space for your project. Your project's repository contains all its files such as code, documentation, images, and more. It also tracks every change that you—or your collaborators—make to each file, so you can always go back to previous versions of your project if you make any mistakes.
2.) Branch:-
A series of commits of a particular project indicates a branch. A repository can have multiple branches. The branch could be the one where there are commits for all the stable features; another branch for commits related to functionalities in the upcoming release; another branch for commits related to bug fixes and so on.
3.) Checkout:-
In Git, the term checkout is used to switch between different versions of a target entity. The git checkout command is used to switch between branches in a repository.
4.) Clone:-
git clone is a Git command-line utility that is used to target an existing repository and create a clone of the target repository on your local machine.
5.) Fetch:-
Downloading code and commit history from remote Git to local Git repository is known as fetching. It’s important to regularly update our code with the latest changes made to the original repository. This process of getting the changes (that is commit history and the actual code) is called fetching.
6.) Fork:-
A fork is a rough copy of a repository. Forking a repository allows you to freely test and debug with changes without affecting the original project.
7.) Master:-
Master is the default name of a repository’s active development branch. The master is the primary branch of all your repositories. It should include the most recent changes and commits.
8.) Merge:-
Merge operation is used to combine multiple commits into one single history. The git merge command facilitates you to take the data created by the git branch and integrate them into a single branch.
9.) Origin:-
In Git, "origin" refers to the default version of a repository. It serves as a system alias for communicating with the master branch. For example, git push origin master, when run on a remote, will push the changes to the master branch of the primary repository database.
10.) Pull:-
The term Pull is used to receive data from GitHub. It fetches and merges changes on the remote server to your working directory. The git pull command is used to make a Git pull.
11.) Push:-
The process of uploading the recorded changes from the local Git repository to the remote Git repository is called pushing. Pushing is capable of overwriting changes; caution should be taken when pushing.
12.) Remote:-
Remote is the term used to refer to the repository hosted in Github. Remote is a generic term used to refer to a repository in Github. In other words, the remote can be used to refer to your origin as well as upstream.
13.) Stash:-
While working with Git, you may need to make multiple changes to files, but you may not want all changes to go in one commit. If you want to pause the changes you are working on now in favor of working on another issue or improvement, you can “stash” your changes, essentially clearing them from the staging area until the changes are called again.
14.) Tag:-
Tag is the label attached to a stable commit of the repository to indicate a milestone in the repository’s history. In other words, tags are used to mark a commit stage as important. We can tag a commit for future reference.
15.) Upstream and Downstream:-
The term upstream and downstream is a reference to the repository. Upstream refers to where you push your changes, which is typically the master branch, and downstream is any project that integrates your work with other works.
16.) Index:-
The Git index is a staging area between the working directory and repository. Whenever you add, delete or alter a file, it remains in the index until you are ready to commit the changes.
Installation
Install Git
Verify Installation:-
Verify if Git is installed, by using the following command in the Terminal :
git --version
If this command returns the version of git in floating digits then Git has been successfully installed on your system.
Ready to get started? Let’s learn how this all works-
Git Configuration
Configuring user information used across all local repositories.
-
git config --global user.name "[username]"set a name that is identifiable for credit when reviewing version history
-
git config --global user.email "[valid-email]"set an email address that will be associated with each history marker
-
git config --global color.ui autoset automatic command line coloring for Git for easy reviewing.
Working With Local Repositories
1.) Create a new Folder
mkdir test
This command will create a new folder named test in your Current Directory(cd).
2.) Initialize Git
cd test/
git init
This command initializes an existing directory as a Git repository and creates a hidden .git folder inside your test folder.
3.) Create Readme file
cat > Readme.md
README files are written in plain text or Markdown language, and usually include a paragraph describing the project, directions on how to use it, who authored it, and more.
4.) Staging
git add .
This command is used for staging all new or modified files.
or
git add <filename>
This command is used for staging a particular file.
5.) Check status
git status
This command is used to check the status of the current repository. If the files are in the staging area, but not committed, it will be shown by the git status. Also, if there are no changes, it will show the message no changes to commit, working directory clean.
6.) Committing staged files
git commit -m "Commit message"
This command makes sure that the changes are saved to your local repository.
7.) Remove file
git rm <file_name>
8.) Logs
git log
This command displays the entire commit history using default format.
Working with Local Branch
1.) Create a branch
git branch <branch_name>
2.) Display all branches
git branch -a
This command is used to list all remote or local branches.
3.) Delete a branch
git branch -d <branch_name>
4.) Delete remote branch
git push origin –delete [branchName]
5.) Checkout an existing branch
git checkout <branch_name>
This command will switch the current branch to .
6.) Checkout and create a new branch
git checkout -b <new_branch_name>
7.) Merge a branch into an active branch
git merge <branch_name>
git merge command is used to integrate the branches together.
8.) Recover a deleted file and prepare it for commit
git checkout <deleted_file-name>
Working With Remote Repositories
Here we will be using GitHub for the remote repository.
First, go to your GitHub profile and create a new Repository.
If you are not familiar with how to work on GitHub Click here.
Once the Repository is created, you will be able to see a page somewhat similar to the following screenshot :
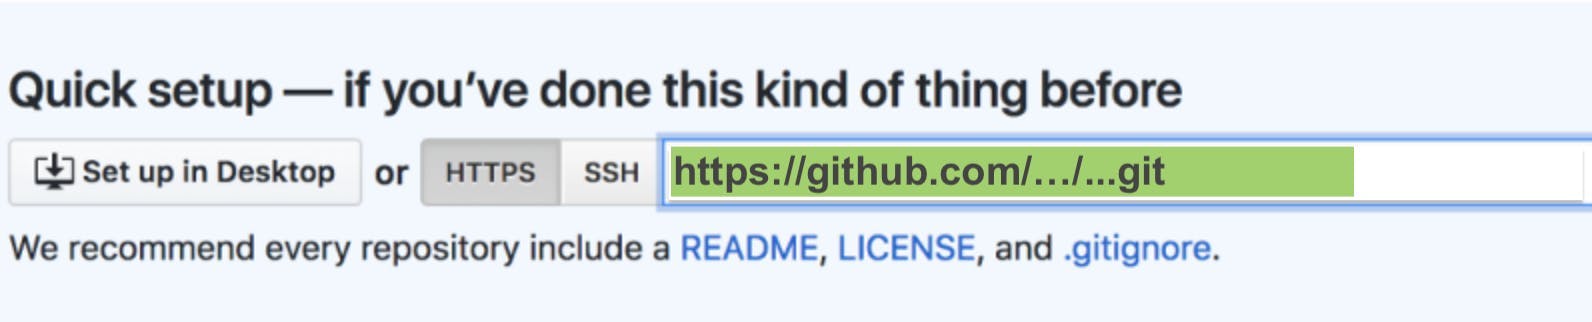 Here the highlighted
 green line is Repository URL. Copy this URL and add in the below command to add the remote to the origin.
1.) git remote
git remote add origin <repository url>
2.) git clone
The git clone command is used to create a local working copy of an existing remote repository.
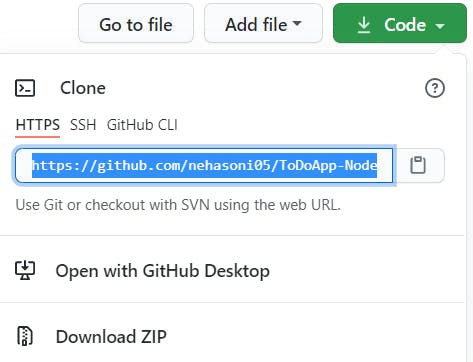 Copy this highlighted URL and add in the below command to clone the repository to your local computer.
git clone <remote url>
3.) git push
This command is used to push all the code from the local repository to the remote repository.
git push -u origin master
4.) git pull
The git pull command is used to fetch and merge all the latest changes from the remote repository to the local repository.
git pull origin master
5.) git fetch
git fetch <remote> <branch>
This command fetches the specific from the repository.
Additional Commands
git stash
git stash -ugit stash pop
Undoing changes
git reset <file>filefrom the staging area but leaves the current working directory unchanged.git clean -n
Define a tag
git tag <tagname>The above command will mark the current status of the project. Create a tag with some name say v1.0, v1.1, or any other name whatever you want.
git diff
git diffThis command is used to track the changes that have not been staged.
git diff --stagedThe above command will display the changes of already staged files.
git diff <commit1> <commit2>The above command will display the changes between two commits.
Conclusion:-
Hope this tutorial has helped you understand various useful commands in Git. You have learned the basics of Git and the different commands that are used, and also saw different Git commands according to the repository they are used in, followed by some advanced commands.
Thanks for reading 😃
I would ❤ to connect with you at Twitter | LinkedIn | GitHub
Share your queries in the comments section.